Magnetic Field of a Current-Carrying Solenoid Generator
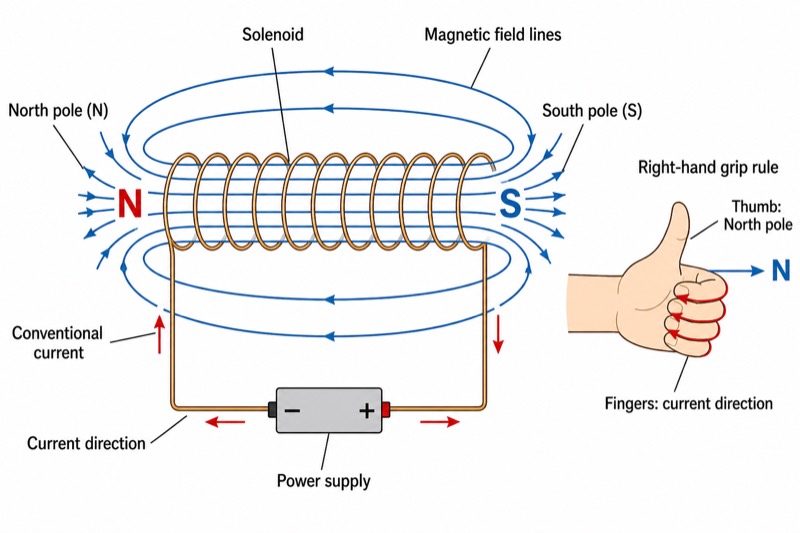
Free online Magnetic Field of a Current-Carrying Solenoid generator: get a fully labeled figure in about 90 seconds. The AI plans the must-have label list first, then renders a clean textbook-style diagram — every label editable afterwards, ready for papers, assignments and slides.
Labels included in this diagram
- Solenoid
- Power supply
- Conventional current
- Current direction
- Magnetic field lines
- North pole (N)
- South pole (S)
- Right-hand grip rule
- Fingers: current direction
- Thumb: North pole
✓ Accurate labels ✓ Edit text after generation ✓ PNG for papers, posters & slides
 OUTPUT · 16:9 · PNG
What this diagram shows
This diagram shows the magnetic field produced by a current-carrying solenoid. A solenoid is a long coil of insulated wire connected to a power supply. When conventional current flows through the coil, each turn produces a magnetic field, and these fields combine to form a pattern similar to the field of a bar magnet. The diagram should identify the solenoid, power supply, current direction, magnetic field lines, and the N and S poles. Inside the solenoid, the field lines are close together and nearly parallel, showing a strong and approximately uniform magnetic field.
The diagram links the circuit, current, and magnetic polarity in a clear sequence. The power supply drives conventional current through the coil; the current direction around the turns determines which end becomes the north pole and which becomes the south pole. Use the right-hand grip rule, also called the right-hand screw rule: curl the fingers of your right hand in the direction of conventional current around the coil, and the extended thumb points toward the solenoid's north pole. Outside the solenoid, field lines go from N to S; inside, they return from S to N, forming closed curves.
What a correct diagram must include
- Solenoid: Draw several connected turns of wire so the coil structure and its two ends are clear.
- Power supply: Show a cell or battery connected in a complete circuit, because current must flow before a magnetic field is produced.
- Conventional current direction: Add arrows on the wire, using the direction from the positive terminal through the external circuit toward the negative terminal.
- N and S poles: Label the two ends after applying the right-hand rule; viewed from the N end, the current around the coil is anticlockwise.
- Magnetic field lines: Draw smooth, continuous curves with arrows; outside they run from N to S and inside they return from S to N.
- Field strength: Draw field lines closer together inside the solenoid to represent its stronger, nearly uniform internal field.
- Right-hand rule: Include a hand or screw-rule indication that connects the current direction with the north-pole direction.
Common mistakes
- Drawing field lines from S to N outside the solenoid only; the external direction must be N to S.
- Ending field lines at a pole instead of joining them into closed loops through the solenoid.
- Using the electron-flow direction when applying the usual right-hand rule; the rule is normally based on conventional current.
- Reversing the N and S labels after correctly finding the current direction around the coil.
- Drawing a single isolated loop or widely scattered lines, which fails to show the combined and approximately uniform field inside a solenoid.
Teaching tips
Use the diagram after students have reviewed current in a wire and before introducing electromagnets. Ask students to trace the conventional current from the power supply, identify its direction around the coil, and predict the N pole before checking the label. Then ask why the field lines are closer inside and why they must form closed curves. Connect the activity to exam tasks: identifying poles, completing field-line arrows, applying the right-hand rule, and predicting the effect of reversing the power supply connections.
FAQ about this diagram
Why does a current-carrying solenoid have N and S poles?
Every current-carrying turn produces a magnetic field. The fields from many turns combine, giving the solenoid a bar-magnet-like field with a north pole and a south pole.
How can the north pole be found from the current direction?
Use the right-hand grip rule: curl the fingers of your right hand in the direction of conventional current around the coil. Your thumb points toward the north pole. Viewed from the north end, the current is anticlockwise.
What happens if the battery connections are reversed?
The conventional current reverses, so the magnetic field direction reverses too. The former N pole becomes S, and the former S pole becomes N, while the field-line pattern remains closed.