Graphical Abstract Maker: A Practical Research Guide
A graphical abstract maker can help turn a complex paper into one visual story that a reader understands quickly. A strong graphical abstract is not a miniature version of the full article. It is a carefully edited visual summary that shows the research question, the main process or comparison, and the central finding in a logical order. For graduate students, students preparing assignments, and teachers creating lecture slides, the goal is the same: remove unnecessary detail while preserving the research structure.
A graphical abstract is intended to let readers understand the core finding of a study in a few seconds and usually must be a single image that can be understood without reading the main text. That requirement changes how you plan the figure. Instead of starting with colors, icons, or decoration, begin with the scientific argument: what was studied, what happened, and why the result matters. A useful graphical abstract maker should support that thinking rather than encourage you to fill a canvas with disconnected objects.
This guide explains a repeatable method for building a graphical abstract, common layouts, what to include and exclude, technical size requirements, and discipline-specific examples. It also covers practical decisions such as text length, visual hierarchy, arrows, accessibility, export settings, and final quality checks before submission or presentation.
1. Start with the research structure, not the artwork
The most reliable way to make a graphical abstract is to reduce the paper to a three-part structure: input, transformation, and outcome. The input may be a research question, sample, dataset, intervention, material, or environmental condition. The transformation may be an experiment, model, treatment, workflow, or comparison. The outcome is the measured result and its scientific meaning. This structure works because readers naturally look for what was studied, what was done, and what was discovered.
Before opening a graphical abstract maker, write one sentence that completes this pattern: “We investigated X by doing Y and found Z.” If the sentence contains several unrelated findings, choose the finding most central to the title or conclusion. A graphical abstract cannot carry every result from a paper, so prioritization is part of scientific accuracy, not a loss of detail.
Create a rough storyboard with three to five boxes before selecting a visual style. Label each box with a short phrase rather than a paragraph. For example, a biology study might become “drought stress,” “gene expression analysis,” and “stress-response pathway activated.” A materials study might become “porous coating,” “thermal cycling,” and “lower surface temperature.” Only after this structure is clear should you choose icons, diagrams, colors, and typography.
- Write the research story in one sentence before designing.
- Choose one primary finding and, at most, a few supporting elements.
- Arrange information in the same order as the study logic.
- Use visual form to explain relationships, not merely to decorate the page.
2. Choose the right graphical abstract layout
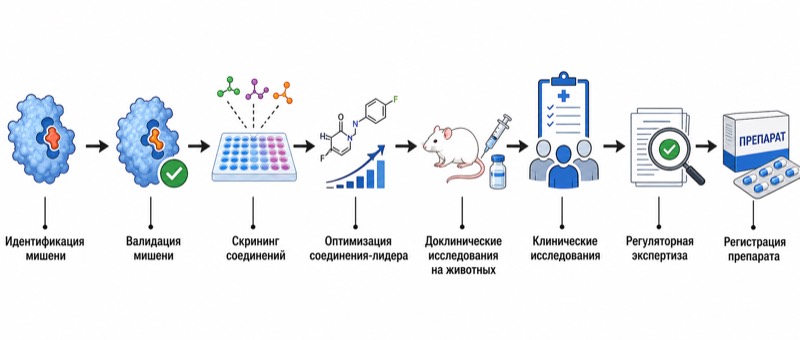
The layout should reflect the type of reasoning in the study. A left-to-right flow is usually effective for methods, pipelines, laboratory workflows, and treatment-response studies. A top-to-bottom layout can work well when the research moves from a problem to an intervention and then to a conclusion. A central-result layout places the key finding in the middle and connects contributing factors around it, which is useful for systems biology, ecology, and multidisciplinary studies.
A comparison layout is appropriate when the paper contrasts two groups, conditions, materials, models, or time points. Divide the canvas into clearly labeled sides and keep the visual grammar parallel: if one condition is represented with a sample icon, use the same type of icon for the other condition. A cycle layout can describe feedback, repeated measurement, or iterative design, but it should not be used simply because circular arrows look attractive. If the study has a beginning and an end, a cycle may create a misleading interpretation.
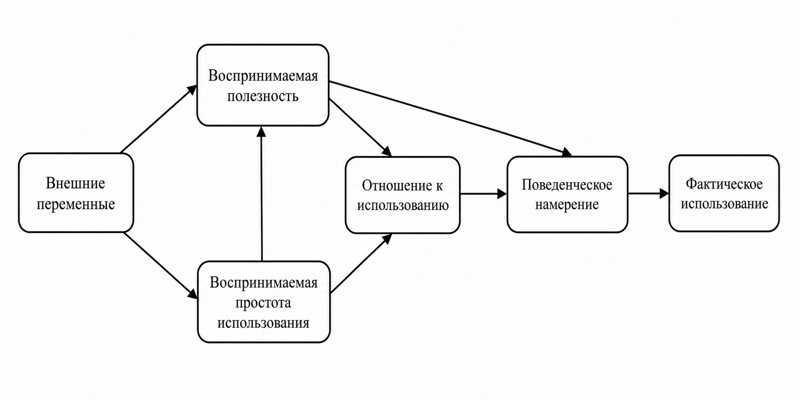
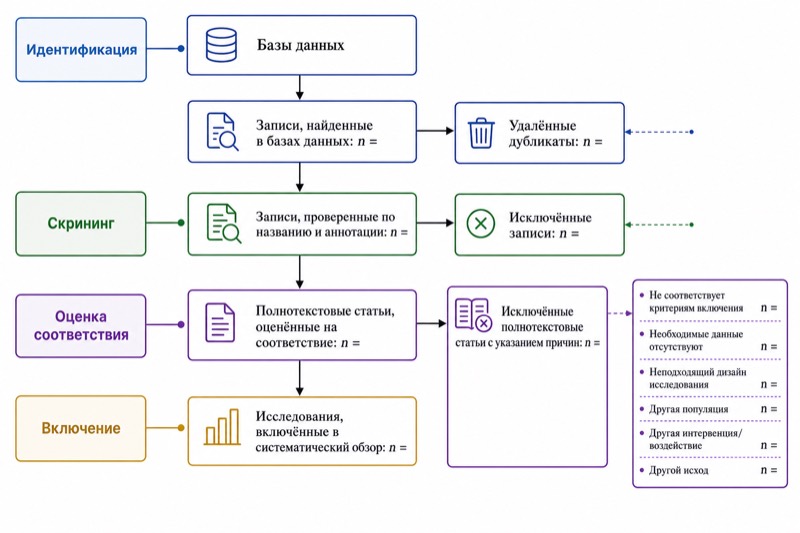
When using a graphical abstract maker, begin with a wireframe containing plain rectangles and arrows. Test whether someone unfamiliar with the project can identify the reading direction and the main conclusion without color. If the wireframe is confusing, adding gradients, illustrations, or more labels will not solve the underlying problem. Keep the number of major panels limited enough that the viewer can scan the complete figure in a few seconds.
- Use left-to-right flow for sequential methods and processes.
- Use side-by-side panels for controlled comparisons.
- Use a central-result structure for interconnected systems.
- Use cycles only when the science genuinely involves repetition or feedback.
- Make the reading direction obvious through spacing, alignment, and arrows.
3. What to include in a graphical abstract
A graphical abstract should include the minimum evidence needed to understand the study’s central message. In most cases, that means the research context, the main intervention or analytical step, and the primary outcome. Include the variable that changes, the variable that is measured, and the direction or nature of the result when that information is essential. If a numerical value is central to interpretation, show it clearly, but do not turn the image into a results table.
Labels should answer questions that visuals alone cannot answer. A microscope icon may suggest imaging, but it does not explain whether the study examined cells, tissues, or materials. Short labels such as “confocal imaging,” “treated cells,” or “higher tensile strength” add scientific precision without requiring a full sentence. Define an abbreviation if the audience may not know it, especially when the image will be used in a class, presentation, or repository outside the specialist journal.
The final conclusion should be visually prominent, not hidden in a small caption. You can emphasize it with a larger result panel, a restrained accent color, a short callout, or a clear contrast between conditions. Make sure the conclusion is supported by the pathway shown. If the image claims that a treatment improves performance, the design should show the treatment, the comparison, and the measured improvement rather than displaying an isolated upward arrow.
- Research question or context, when needed for interpretation.
- Main sample, population, material, dataset, or study system.
- Core method or intervention, stated in short labels.
- Primary result and its direction, comparison, or mechanism.
- One concise takeaway that matches the paper’s actual conclusion.
- Legend or abbreviation explanation when the symbols are not self-evident.
4. What not to include: common sources of visual overload
The most common mistake is trying to place the entire abstract, methods section, and results summary into one image. Long paragraphs are difficult to scan and often become unreadable after the figure is embedded in a journal page or projected in a classroom. Replace explanatory prose with a sequence of labeled visual units. If a detail cannot be understood from a short label, ask whether it belongs in the paper, figure caption, supplementary material, or speaker notes instead.
Avoid decorative elements that compete with the evidence. Realistic laboratory equipment, complex background scenes, excessive shadows, unrelated stock imagery, and repeated icons can consume attention without improving comprehension. A visual should earn its space by showing a process, relationship, comparison, scale, or result. Do not use an icon merely because the design feels empty.
Do not imply causation when the study only shows association. For example, a solid arrow from a correlated factor to an outcome may suggest a confirmed mechanism. Use a dashed relationship, neutral connector, or explanatory label when the evidence is observational or exploratory. Likewise, avoid visually exaggerating a small effect with a dramatic arrow or distorted scale. A graphical abstract is a communication tool, but it must remain faithful to the study design and evidence.
- Do not paste the full abstract into the image.
- Do not add every secondary result or statistical detail.
- Do not use decorative icons with no explanatory role.
- Do not create causal arrows that the study cannot support.
- Do not rely on color alone to communicate a category or result.
- Do not shrink labels until they are unreadable at the intended display size.
5. Size, resolution, and export requirements
Technical preparation is as important as visual composition. Elsevier and other publishers often require a minimum 1328×531 pixels and an aspect ratio of about 5:2 (requirements vary by journal; check the official guidelines). These values should be treated as a publishing reference, not a universal rule for every journal, conference, repository, or course platform. Always verify the destination’s official instructions before exporting the final image, because file format, color profile, maximum dimensions, resolution, and naming rules may differ.
A wide canvas is common for journal graphical abstracts, but the correct working size depends on where the image will appear. If it will be placed in a slide deck, check how it looks at the actual slide width. If it will be uploaded to a submission system, inspect the platform’s stated pixel limits and accepted file types. When the official instructions specify a minimum pixel dimension, design at or above that dimension while preserving the required aspect ratio. Do not stretch a finished image afterward, because stretching can distort icons, text, and scientific diagrams.
Before export, inspect the image at 100 percent zoom and at a smaller preview size. At 100 percent, check edge quality, alignment, line joins, and spelling. At the smaller size, check whether the main story and conclusion remain visible. Export using the file format requested by the destination, and retain an editable source file separately. If the tool offers raster and vector options, choose the option accepted by the submission system and follow the official guide rather than assuming one format is always superior.
- Confirm the journal, conference, school, or platform requirements first.
- Use the official minimum pixel dimensions and aspect ratio when specified.
- Check the image at both full size and realistic preview size.
- Keep an editable source file and a final submission file.
- Treat all publication-specific requirements as subject to the official guidelines.
6. Discipline-specific graphical abstract examples
In life sciences and medicine, the most useful structure often follows a biological pathway: condition or sample, intervention or exposure, cellular or molecular process, and phenotype or clinical implication. Use consistent representations for cells, tissues, molecules, or patient groups. A medical graphical abstract should distinguish participants, treatment, measurement, and outcome, and should avoid implying that a preliminary result is a universal clinical recommendation. If the study is observational, make that design visible through careful wording and non-causal connectors.
In chemistry, materials science, and engineering, show the relationship between composition or fabrication, testing conditions, and performance. A materials study might show precursor materials, a synthesis or coating step, a test such as compression or thermal cycling, and the resulting change in strength, conductivity, or durability. Use a small number of representative structures or cross-sections instead of displaying every formulation. When a mechanism is proposed, label it as a mechanism or hypothesis if the evidence does not directly verify it.
In environmental science, earth science, and ecology, a map or ecosystem context may be necessary, but it should support the main story rather than dominate the canvas. A useful sequence could be site or climate pressure, field sampling, analytical method, and ecological result. Use a simplified map with only relevant geographic information. For data science, computer science, and social science, show the dataset or input, preprocessing or model, evaluation method, and key metric or behavioral finding. Clearly distinguish training data, test data, prediction, and observed outcome when those distinctions affect interpretation.
- Biology and medicine: condition, intervention, pathway, and phenotype or outcome.
- Chemistry and materials: composition, fabrication, test condition, and performance.
- Engineering: system input, design or control method, evaluation, and result.
- Environmental science: site context, sampling, analysis, and ecological implication.
- Data and computer science: data, processing or model, evaluation, and metric.
- Social science: population or setting, research design, comparison, and finding.
7. A practical workflow for using a graphical abstract maker
Start by collecting the paper’s title, one-sentence finding, essential variables, and any required terminology. Then sketch the information hierarchy in three levels: primary message, supporting steps, and optional context. The primary message should be readable first. Supporting steps explain how the result was produced. Optional context should be removed if it makes the main path harder to follow.
Next, build the figure in passes rather than trying to perfect it immediately. In pass one, place only panels, arrows, and text labels. In pass two, add scientific symbols and a restrained color system. In pass three, refine spacing, alignment, line weight, and emphasis. This order prevents visual styling from hiding structural problems. A graphical abstract maker is most efficient when it is used as a planning and editing environment, not just as a library of ready-made pictures.
Ask a classmate, lab colleague, or student from another field to view the draft for five seconds and then explain what they think the study found. Do not guide them while they look. Record the words they use and compare them with your intended message. If they notice the method but miss the result, enlarge or reposition the conclusion. If they interpret the arrows incorrectly, change the layout or connector style. Finish with a scientific accuracy check by comparing every claim, label, and direction of change against the manuscript.
- Extract the title, central finding, variables, and required terminology.
- Create a wireframe before choosing colors or illustrations.
- Build structure, then symbols, then typography and polish.
- Test the image with a reader who does not know the project.
- Compare every visual claim with the actual methods and results.
- Export only after checking readability, dimensions, spelling, and official submission rules.
Вопросы об этой схеме
What is a graphical abstract supposed to show?
It should show the central research question or context, the main process or comparison, and the primary finding in one visual story. The image should let readers understand the core discovery in a few seconds and should normally be understandable without reading the main text.
What size should a graphical abstract be?
Elsevier and other publishers often require a minimum 1328×531 pixels and an aspect ratio of about 5:2. Requirements vary by journal or platform, so always check the official guidelines before designing and exporting the final image.
How much text should I put in a graphical abstract?
Use short labels, keywords, and concise result statements instead of paragraphs. Include only the words needed to identify the sample, process, comparison, result, or mechanism, and move detailed explanations to the manuscript, caption, or presentation notes.
Which layout is best for a graphical abstract?
Choose the layout that matches the study’s logic. Use left-to-right flow for sequential methods, side-by-side panels for comparisons, a pathway for biological or mechanistic studies, and a central-result layout for interconnected systems. Test the wireframe without color to make sure the reading order is clear.